.
AeroJunk Folio by Paul McKay
(this page is a draft some webteam work needed on images)
First of all, what is an AeroJunk? A few general definitions will help describe it.
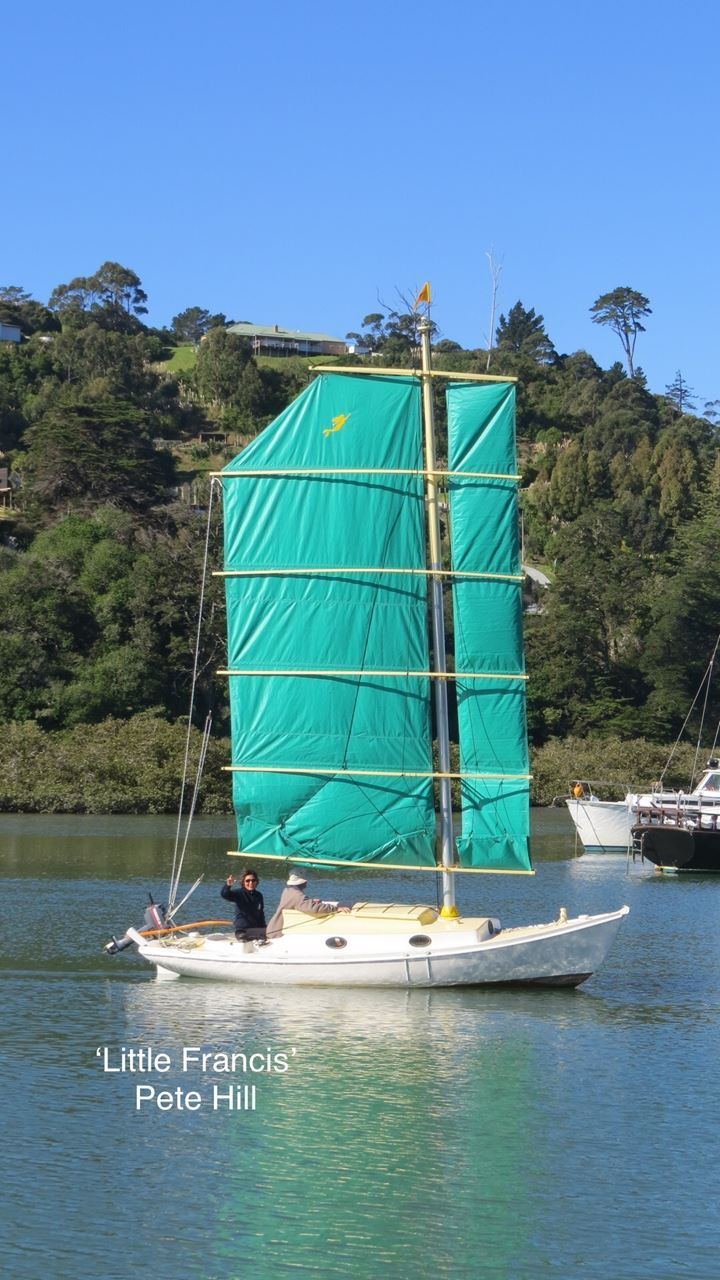
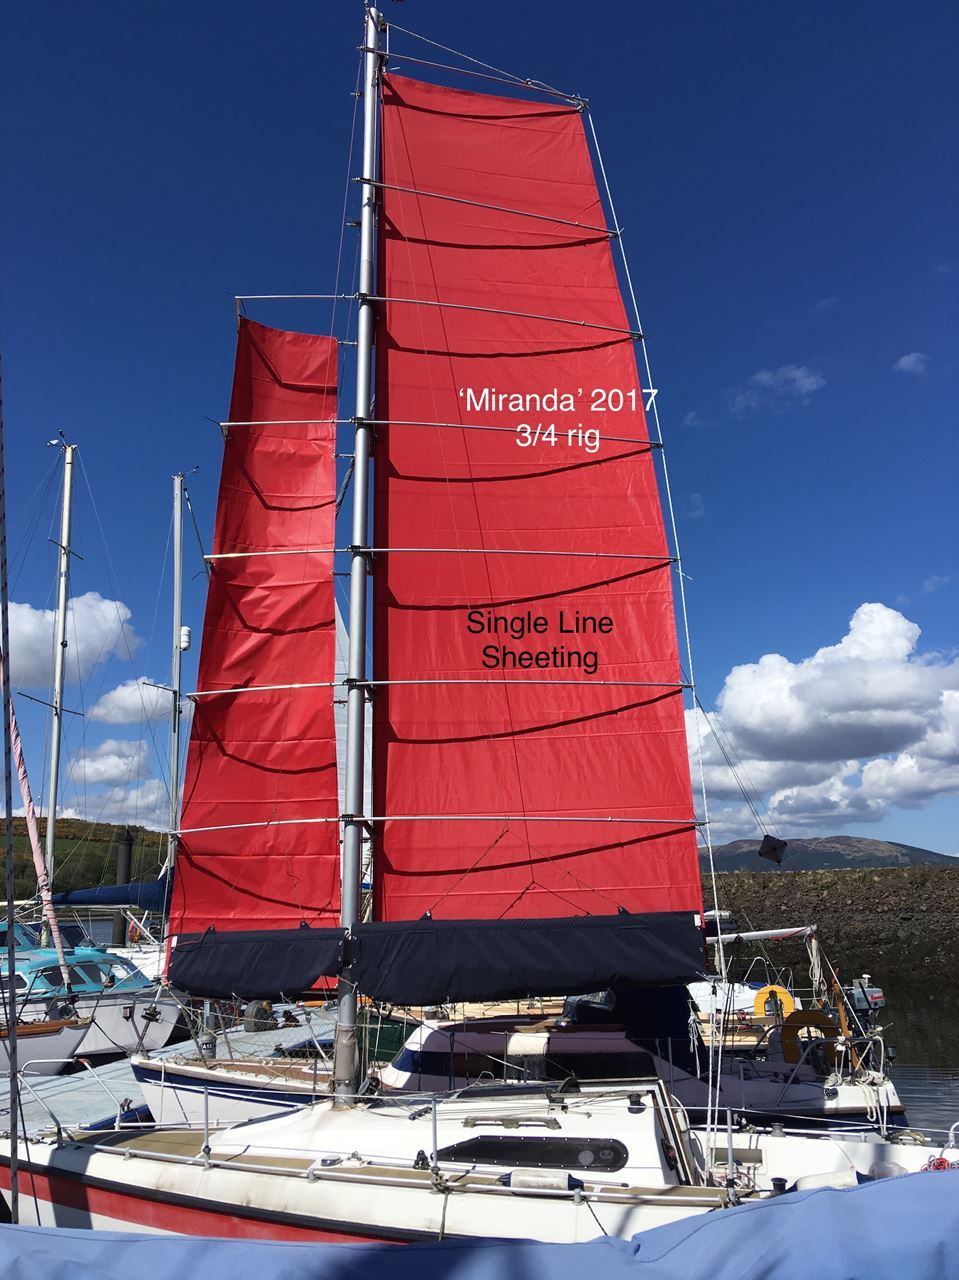
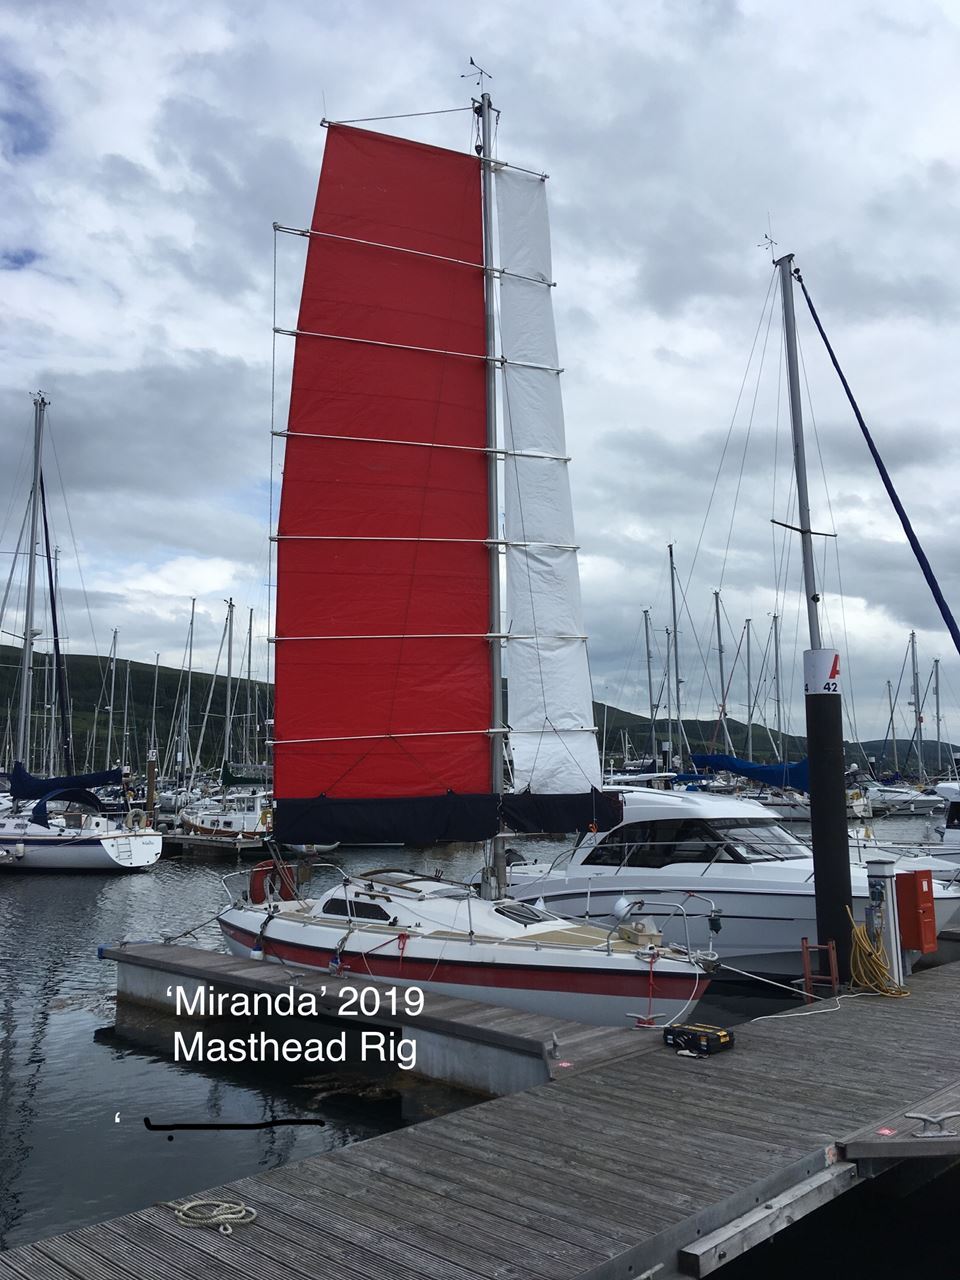
(See photos of ‘Miranda’ from 2014, 2017 and 2019)

All modern Western Junk Rigs have this in common - they are fully-battened balance-lug sails that sit to one side of the mast, usually Port side. There have been many variations but the main groups can be defined as follows -
Western Junk Sail or HM. (Hasler/McCleod.) Rigid battens with a flat sail made from straight vertical or horizontal panels. No camber or slot effect.
Cambered Junk Sail. (Arne Kverneland.) Rigid battens with a cambered sail sewn from lens or barrel-stave shaped horizontal panels. When attached to parallel battens the panels produce camber. No slot effect.
Split Junk Sail. (Slieve McGonagal.) Rigid battens with common upper section and the lower sail split vertically about the mast. Main made from cambered panels, jib made from cambered panels (“jiblets”) that when fastened to parallel battens produce vents giving the ‘slot effect’. So a Split-Junk is a two part Cambered sail.
Wishbone Junk. (Paul McKay.) Wishbone battens with a flat sail made from vertical or horizontal panels. Mounted on one side of the mast. Sail fastened to the ends of each batten. Eyelets in the body of the sail allow it to blow across the spacer crossbars on each tack. Camber produced by batten shape. No slot effect.
AeroJunk. (Paul McKay.) Wishbone battens with a flat sail split about the mast. Wishbones mounted on both sides of the mast. Camber produced by battens. Mainsail fastened between batten rear and batten crossbar behind mast. Jib fastened between batten front and a slide line in front of mast. Free-tacking jib produces slot effect. So an AeroJunk is a two-part Wishbone sail. (See AeroRig for comparison)
Note. Although most Junk Rigs have angled battens, especially towards the top of the sail, the AeroJunk works better with parallel battens as this allows some lateral adjustment.
General
HM, Cambered and Wishbone Junks can alter their sail balance while sailing by pivoting the whole sail forward or aft.
AeroJunk has a fixed balance point provided by the batten crossbars behind the mast. Like the Split Junk, AJ has a larger area of sail in front of the mast. This gives lighter sheet loads. The jib is usually a maximum of 1/3rd (33%) the area of the main or 25% of the total sail area, especially for high aspect-ratio rigs, as anything larger causes the whole rig to turn broadside to the wind in winds of F4 and above. However low aspect-ratio rigs can have a greater percentage area of jib and still balance.
Why wishbone battens?
Wishbone battens with the widest point between 25 and 40% of the mainsail chord give an ideal aerofoil shape to the mainsail. Wishbones allow a flat sail to produce camber, so trial sails can be made from cheap flat material such as plastic tarpaulins. Also, in the AJ, because the battens enclose the mast, the mainsail luff is carried clear of the mast on both tacks removing any turbulent interference to the air on the lee side of the sail. So there is no ‘good tack’ or ‘bad tack’.
Mast, mast position and lead
As on most Junk rigged boats, the mast is unstayed and free-standing. It can be made from carbon fibre, solid wood, hollow wood, aluminium or a hybrid with a stock 6 metre aluminium tube topped with wood to the final mast height. Generally the mast will be a similar height to the original BM rig but can be lower. (Miranda’s 9.9 m overall mast is aluminium, 4.5” diameter at the base tapering to 4” in the middle tapering to 3.5” for the last 2 m. It sits in a keel to deck socket made from 5” aluminium tube. For comparison she has a 21m2 sail area)
The new mast position depends firstly upon the original donor hull, whether a mast-head rig or a 3/4 rig, its Centre of Lateral Resistance and the original ‘Lead’. If not known the CLR can be found from a cut out silhouette of the underwater hull and keel balanced over a ruler. Draw a vertical line where it balances. This is the CLR. Note. If the donor boat has a masthead Rig then the new mast position will be a metre or more further forward from the Bermudan mast. On many boats, there will be an opening hatch in the ideal new mast position. This can be removed and the opening used to fit the new mast partners.
‘Lead’ is an allowance for the fact that when the sails swing out, the Centre of Effort of the sails also moves out and forwards producing a turning moment. The CLR also moves forward a little as the boat heels. If the C/E is behind or alongside the CLR the boat will try to turn to windward causing weather helm. If a sailing boat had too much “lead”, ie one where the C/E was well ahead of the CLR, there could be a tendency towards “Lee-helm” which means the boat always turning down wind if you let go the tiller. This can be dangerous. A small amount of “Weather-helm” is desirable as the boat tends to turn up into the wind and stop when you let go the tiller.
Some nicely balanced boats have a little Lee-helm in light winds and a little Weather-helm in stronger winds. Too much Weather-helm means you drag the rudder through the water at an angle which slows the boat down. Time to reduce the (main) sail area.
Finding the original lead.
Work out the combined Centre of Effort of the original BM sailplan. This is found from the centre of the mainsail and the centre of the fore triangle. On masthead rigs the jib and main sails are often of nearly equal area so the combined C/E is close to or at the mast. On 3/4 rigs it will be some 500 to 700mm behind the mast.
(Bermudan boats usually have a large overlapping Genoa but the working sail area is always No. 1 jib, which roughly equates to the foretriangle.)
Look up or work out the area of the main and the triangle down to near deck level. Draw a line between both centres. Work out the percentage of the main area to jib area then mark that point on the line.
Example: the foretriangle area is 70% of the mainsail area. Measure 30% of the line distance forward from the centre of the main or 70% of the distance from the centre of the fore triangle back then mark. Measure the horizontal distance between this point and the CLR. Now work out that as a percentage of the waterline length. This is the original ‘lead’.
The actual lead percentage to use now depends on the length of the new boom behind the mast and whether the boat has a fine or beamy hull but is usually around 6 or 7%. HM and AK use ‘leads’ of up to 12/15% for low aspect ratio (squareish) Junk sails as their C/E moves a long way out and forward.
So now the new mast position will depend on the combined C/E of the new sailplan and whether it is high, medium or low aspect ratio and how much lead to allow. High aspect, perhaps as little as 3%, medium 6/7% and low aspect as much as 10/15%.
Designing the Sail plan
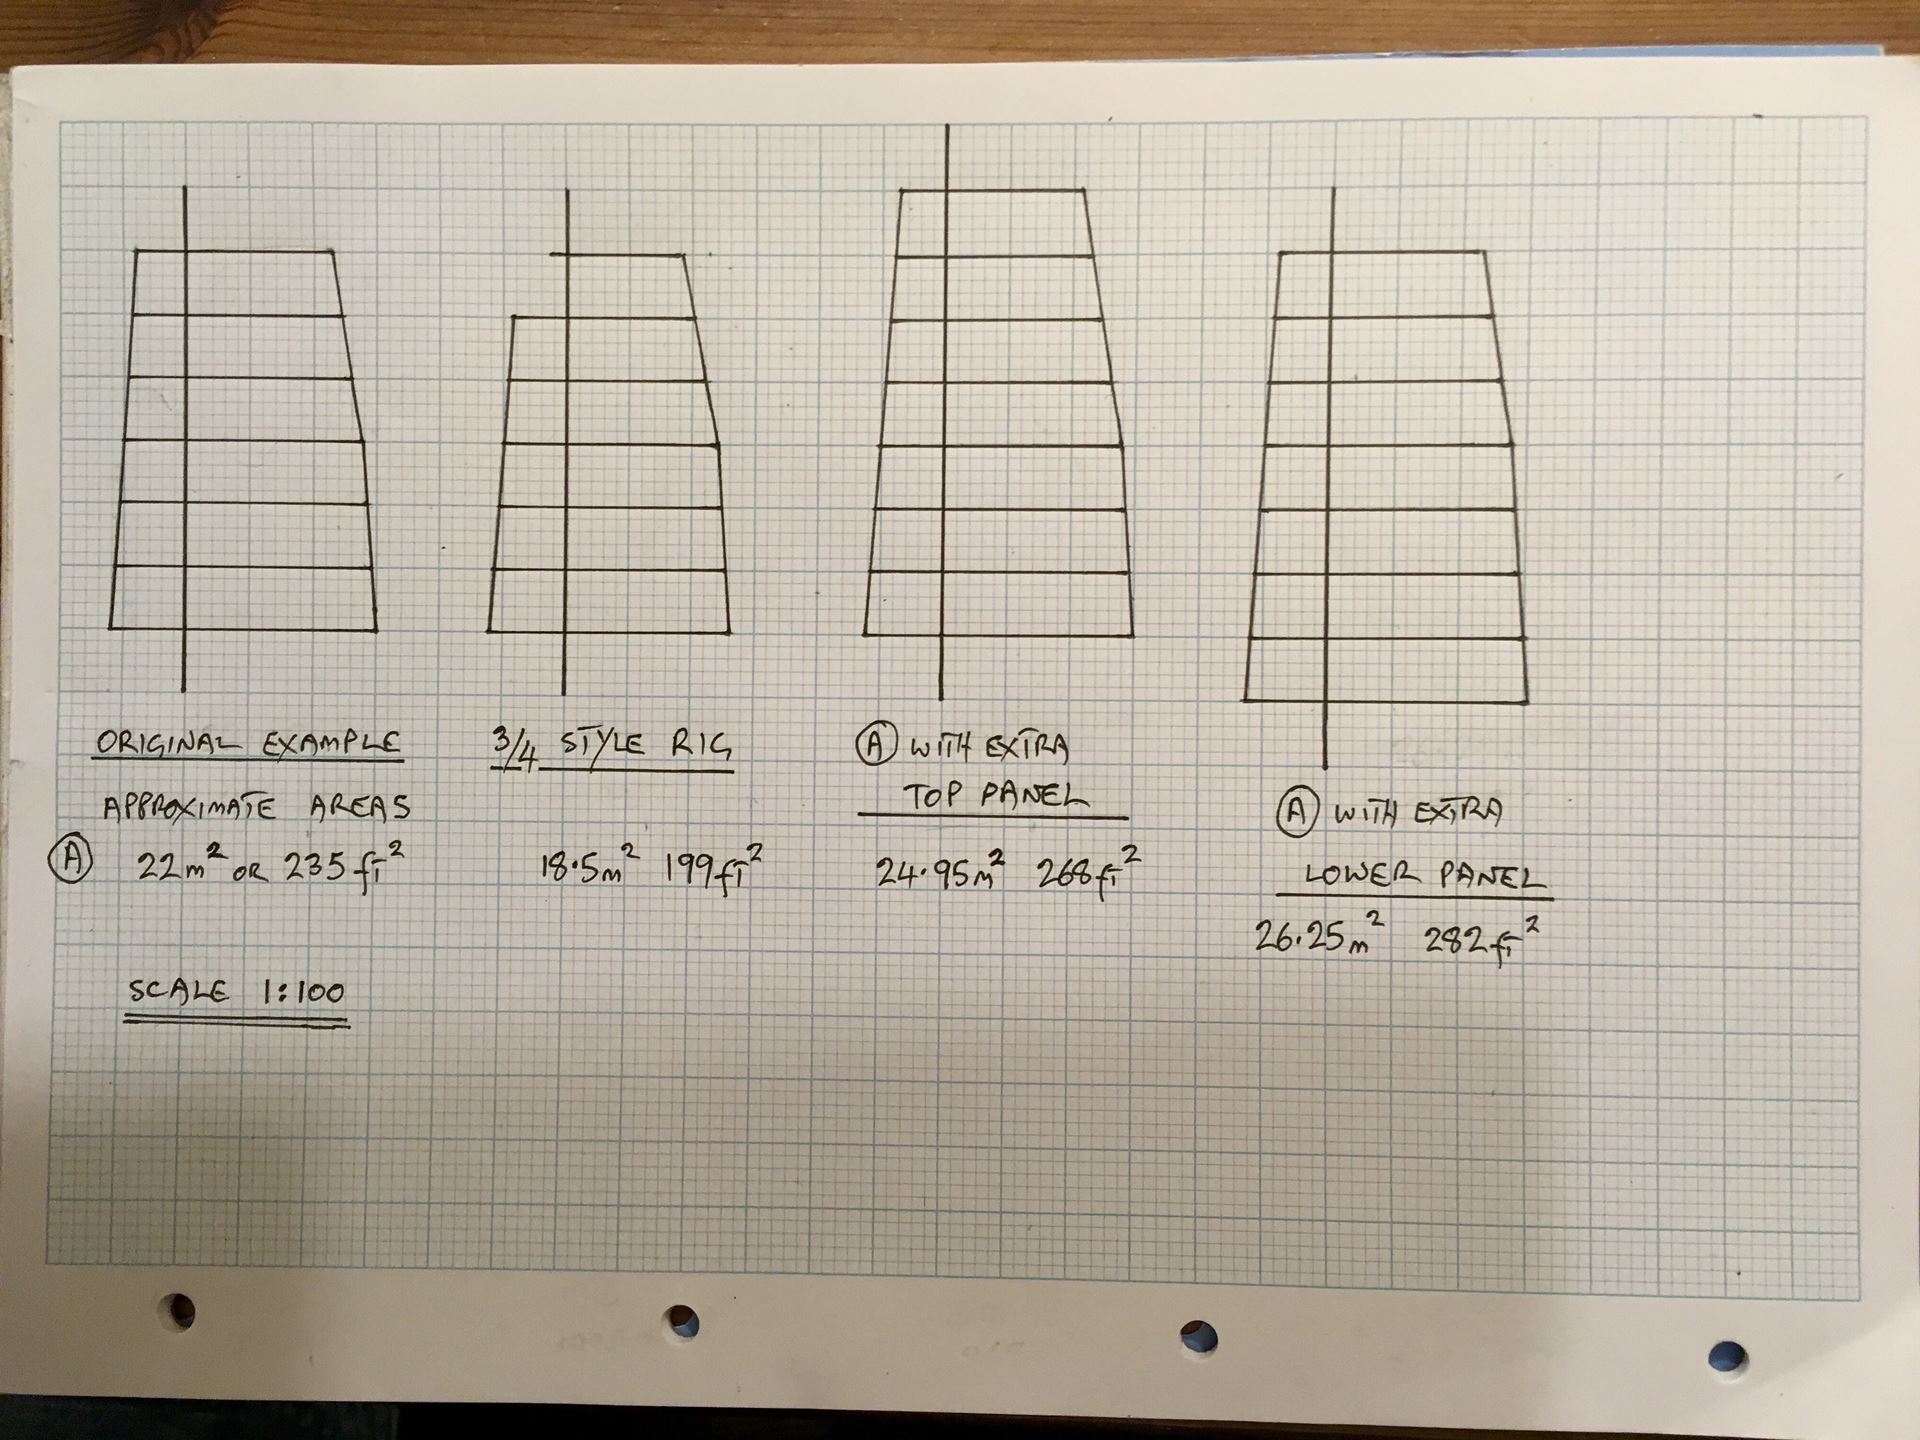
First of all using the original mast height, draw on squared paper a single sail of a shape that would please you if you saw it on the horizon. Allow a gap of about 50/100 cm from the top of the mast to the top of the sail for the halyard blocks. Allow about 50cm between the boom and cabin top. Work out its area and compare that to the original BM sailplan (main and foretriangle). As junks are so easy to reef you can afford 20 or 25% more area.
Example: draw a box on graph paper at a scale equal to 6 metres high x 4 metres wide. Draw a vertical line for the mast a quarter of the way along the bottom of the box. This gives you a ‘jib’ area and a ‘mainsail’ area. Alter the jib luff angle by pivoting the line about a point halfway up, making the foot longer and the head shorter (this keeps the jib area roughly the same) and the main leech shape to make the sail ‘pretty’.
(Beware making or using a standard triangular “Bermudan” jib! The lower half of your sail might try to twist to windward in stronger winds! See ‘AeroJunk Balance’ later.)
Find the centre of the whole area and mark. Cut out this shape and try it over a drawing of your hull at the same scale. Place the new C/E over the original to see where the mast will go.* Now check whether that position would be suitable.
*Note: the new CE will be higher up than the original.
If you need to move the mast forward you will have to lengthen both the jib and the main to keep the sail balance. (For every inch or 25mm extra on the jib add 3 inches or 75mm to the main) This will enlarge your sail area and lower the aspect ratio. You might also have to increase the lead slightly.
Example: the mast needs to go 9” further forward. Add 9” or 230mm to the ‘main’ luff and head then add 3” or 75mm to the ‘jib’ foot and head.
If you have to move the mast backwards you will need to shorten the length of both the jib and the main, again in a 1:3 Ratio to keep the sail balance. This will reduce the sail area and increase the aspect ratio. You might have to reduce the lead slightly. (On Miranda,originally a 3/4 rig BM, my new mast is offset to port alongside the original BM mast position. This has necessitated a high aspect ratio sail plan, a reduced area and a small lead. (3%) However it has proved efficient upwind and in stronger winds, only losing out in light winds, F1/2.)
Having found a good position for the mast go back to your sailplan. Now move the jib forward 8” or 20cm. This will move the C/E forward and increase the lead slightly but will reduce any weather-helm. This is to allow for half the mast diameter and the jib leech slide line. (For larger sail areas with a larger diameter mast, say 30m2+, move the jib 25cm.) Also move the mainsail backwards by 8-12cm to allow for half the mast diameter plus the crossbars. Lastly check the lead and the aspect ratio you have ended up with to see where it fits between 3 and 12%.
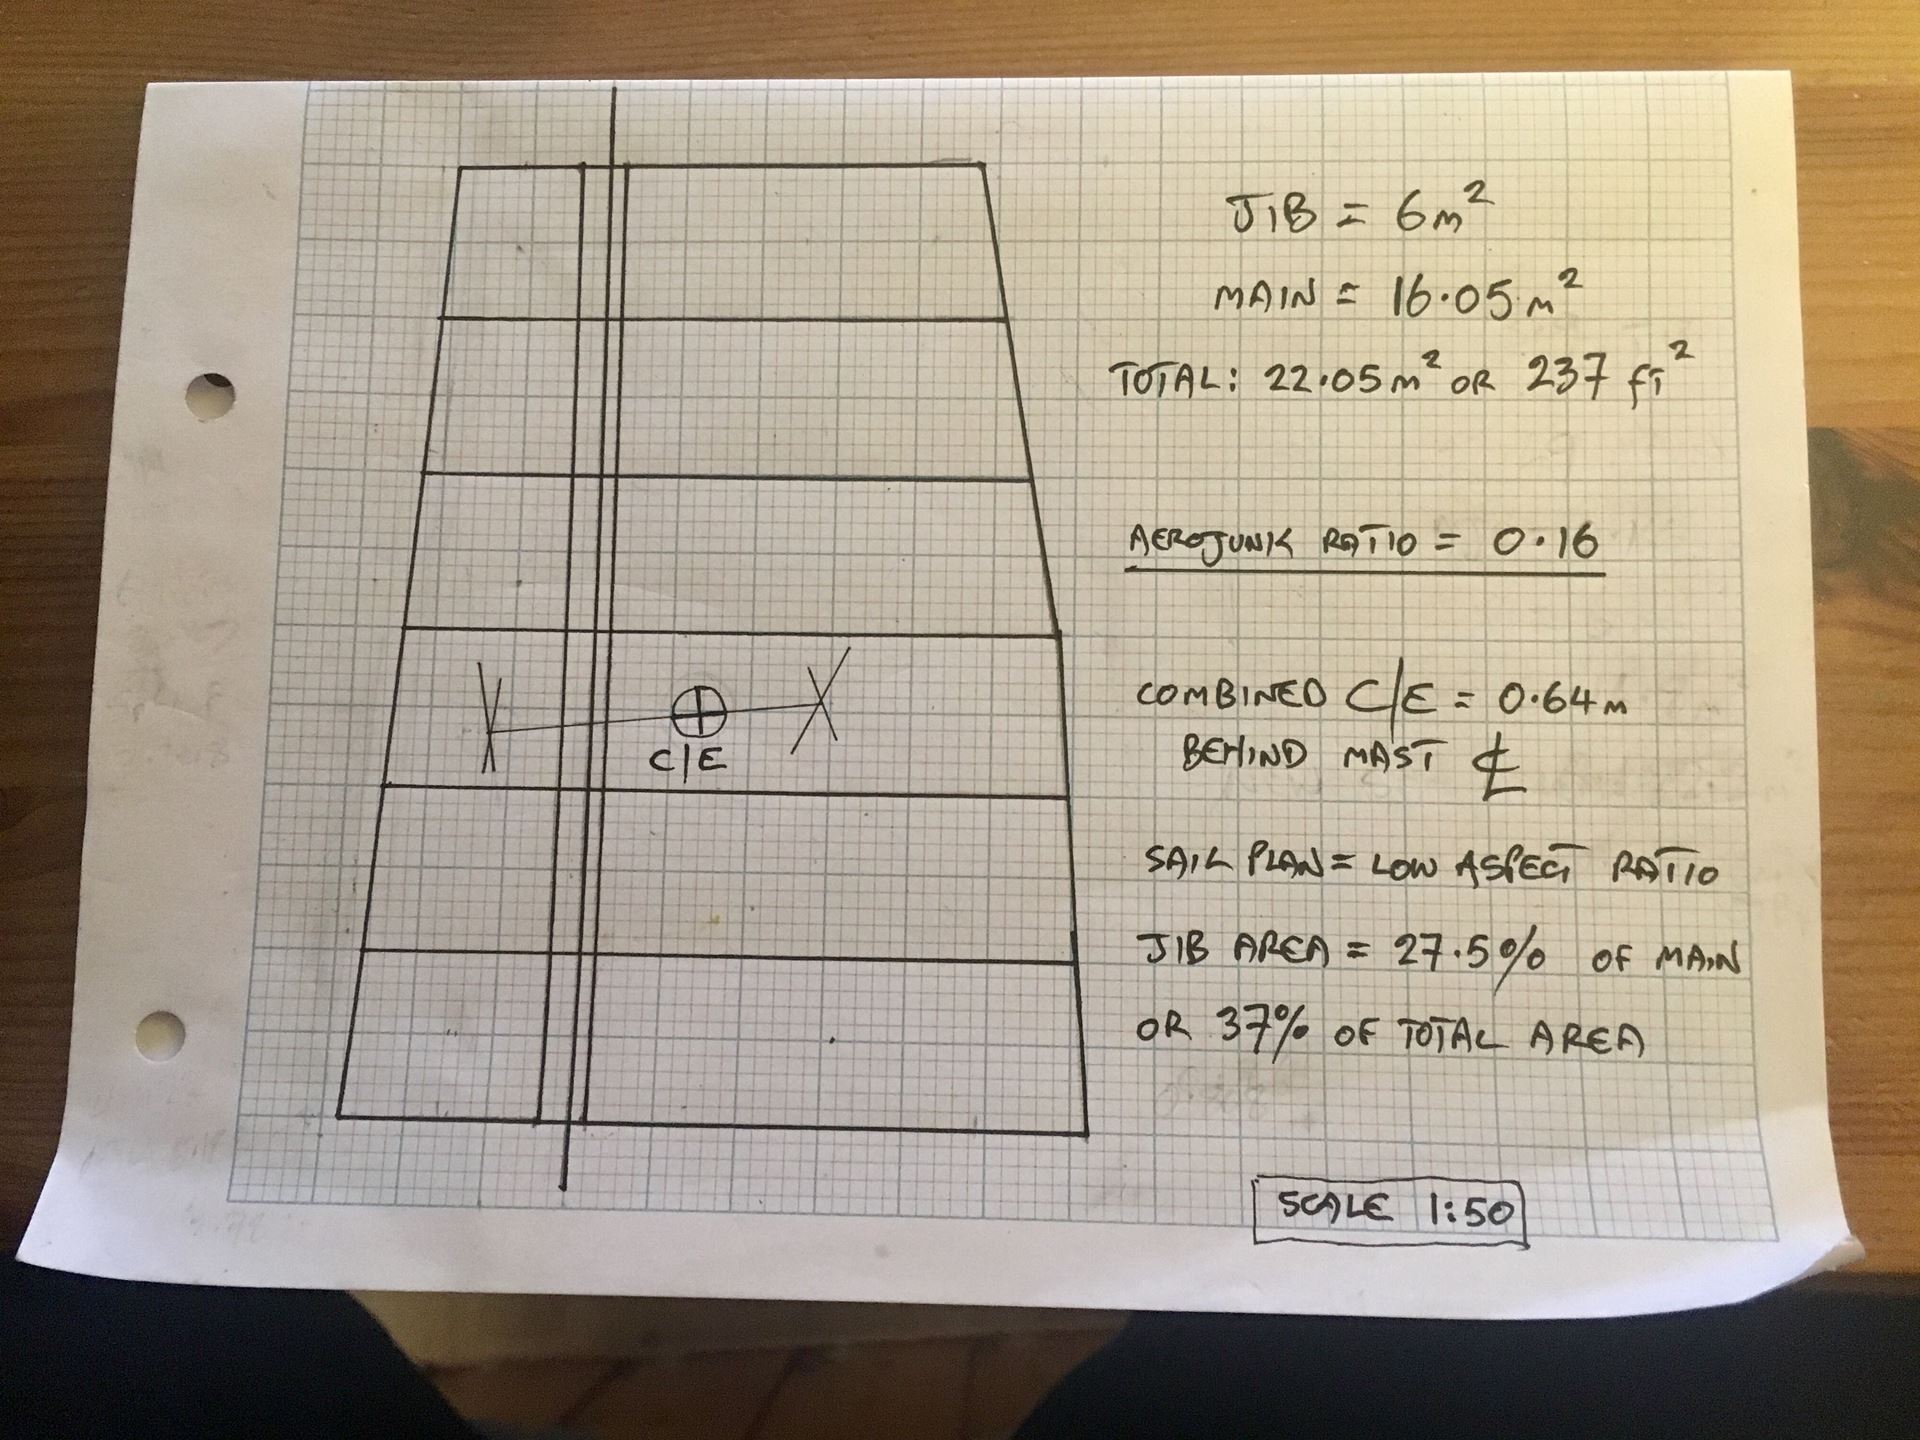
Finally you can check to see if it will work by a simple calculation to find the AeroJunk Ratio** Multiply the jib area in m2 or ft2 by the distance from the jib c/e to the mast centreline in metres or feet. This is factor 1. Multiply the mainsail area by the distance from its c/e to the mast centreline. This is factor 2. Divide factor 1 by factor 2. This ratio will produce a number somewhere between 0.10 and 0.20. Good AJR numbers are between 0.16 and 0.195. Anything 0.20 or larger will cause the whole sail to swing broadside at 90 degrees to the wind in force 4 winds or stronger. If you do have to reduce this ratio then make the jib foot and head slightly shorter or the mainsail foot and head slightly longer. Note this will move the C/E back as well.
If the number is between 0.10 and 0.15 you can either move the whole jib further forward or make the jib slightly bigger.
** This is the comparison between the area of the jib and the area of the main. It is important when both sails are attached to common booms and battens that pivot round the mast and can be thought of like a balanced rudder blade.
It is influenced by the Aspect Ratio of the whole rig. ie, the ratio of the height of the rig to the length of the common boom. For high AR rigs, (over 2:1) the jib should usually be no larger than 33% of the main or 25% of the total sail area. However, I have found by measurement that low AR rigs (0.85:1) can have as much as 42% jib area and still balance.
The ratio is found above.
The example sail can be used as a template or the basis for a number of variations. I suggest 3 possible variations above.
Making the Sails
You can make your own sails or like me, have them made for you. As they are flat and not shaped it is a relatively straightforward task and there is much information on sailmaking available from the JRA.
When you look at the sailplan you have drawn, you are actually seeing the sails flat and stretched between luff and leech. But sails are curved by the wind and the Jib sets at an angle to the Main so before you draw up your final plans, add 2% to the length of the Head and Foot of the Jib and 1% to the length of the Head and Foot of the Mainsail. This will allow for the 1:8 camber of the Jib and will give some room to adjust the Mainsail camber between 1:8 and 1:16 by slackening or tightening the outhaul.
(Example: the foot of the jib on the sailplan measures 1 metre or 1000mm. Add 20mm when cutting out the sailcloth.)
Battens
Wishbone battens can be made from bamboo and cane, timber, carbon fibre or aluminium tube, square, rectangular or round in section. (My latest battens are made from telescoping aluminium tubing where one size fits inside the size above or outside the size below. Each tube is either 6 feet or 2 metres long. The wider tube has a short slot cut where it joins the smaller one and the two are held together with S/S hose clips, or no slot and just screws or rivets. These tubes have a 1mm wall thickness so a 3/4” tube fits inside a 7/8” tube which fits inside a 1” tube) Note, aluminium tube diameters are still made in Imperial measurements!
In general, the battens do not need to be either heavy or overly stiff. They are only there to stack on each other and to give shape to the sails. Because the sides are under tension the whole wishbone itself becomes rigid.
At the mainsail leech the battens are connected to a short horizontal crossbar or a vertical plate with two holes. The inner hole connects to the sail leech, the outer is for a sheet or sheetlet.
At the mainsail luff there is a crossbar behind the mast. This spaces the wishbone sides apart. The mainsail luff connects to the centre of the bar.
200 mm further forward lies the jib leech line. The leech of the jib slides across this on each tack.
At the luff of the jib there is another crossbar, shorter than the main cross bar. The jib luff is connected to the centre of this bar.
Because the battens are not bent to shape they remain under tension. It is important to remember that the front bar has to be detachable as the wishbone is fitted round the mast before the front bar is secured.
As the sails are fitted to the centre of the wishbone it tends to remain horizontal, especially when one of the sides presses against the mast on each tack.
Where the batten touches the mast between the crossbar and the jib leech line it has to be padded so as to protect the mast. Padding can be plastic tube, multiple cable ties, wood, cloth or leather but should slide easily when wet for sail hoisting and dropping.

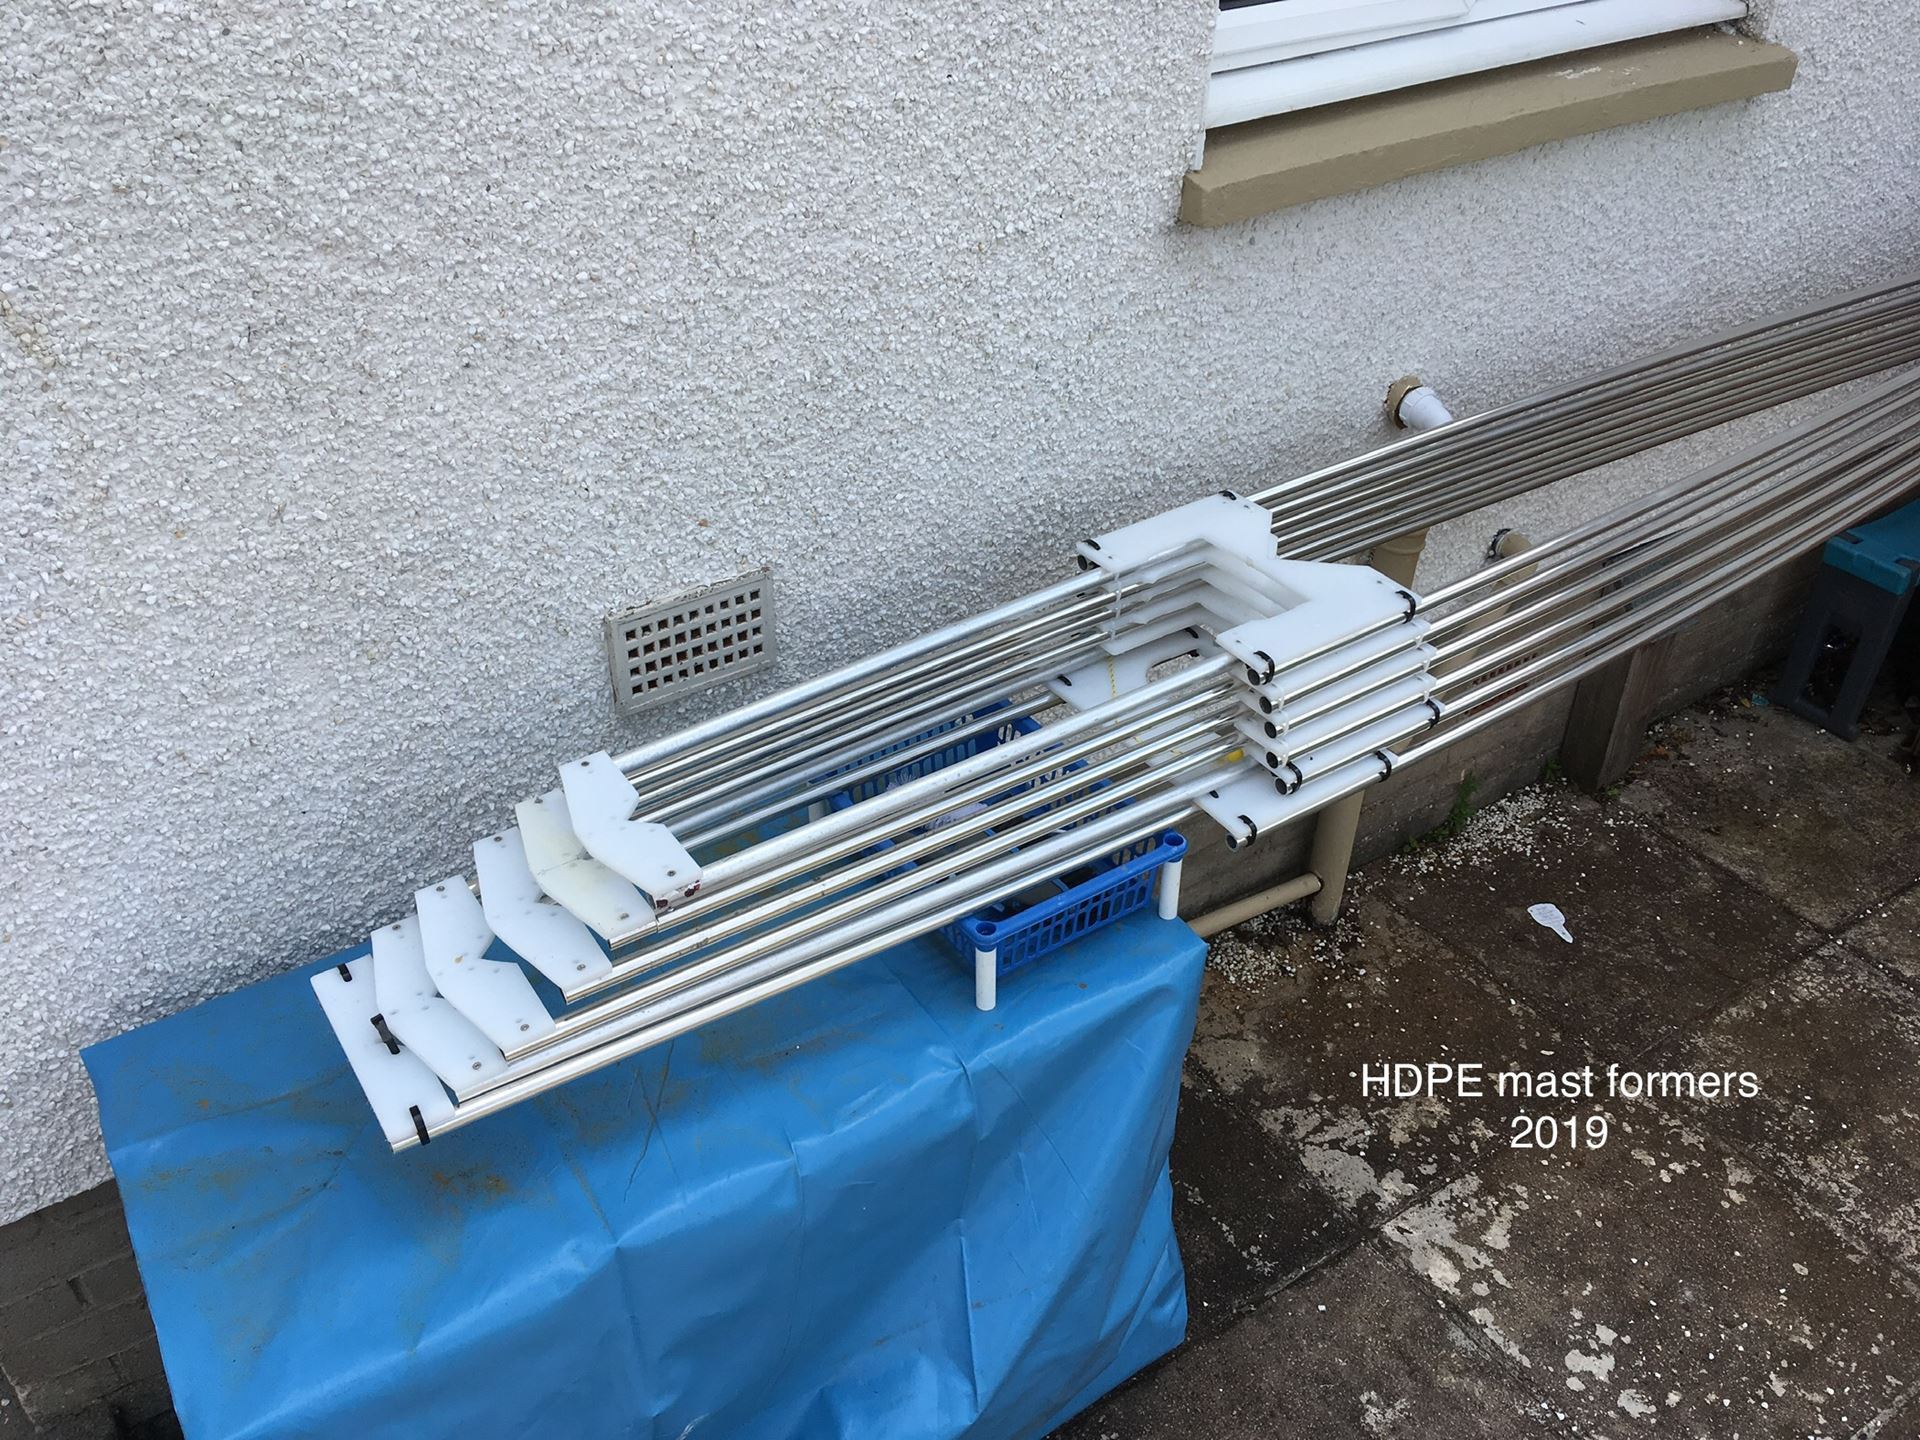
You can instead make mast plates from plywood or HDPE sheet. These are square “U” shaped formers where the open end of the U faces forwards and the inside bottom of the U bend touches the back of the mast. The gap between the insides of the U are 2x mast diameter. This allows the mainsail luff to line up with the Lee side of the mast on each tack reducing turbulence from the mast. The outer edges of the U have the wishbone tubes fastened to them. These edges are far enough apart to allow the mainsail to develop its aerodynamic curve at about 35% of the mainsail chord. (The inside bottom of the “U” has squared corners to allow for the halyard when tacked.)
The ends of the front arms of the U carry the jib slide line. This should be wide enough to allow the jib to set at 7 or 8 degrees off the centre line.
Batten Width
The width of the boom or lowest batten is found by trial and error. Fasten two tubes together at the rear end with a short cross bar. Measure the foot length of the mainsail then place a length of wood temporarily over the tubes so the tubes form a long triangle. At 30% back from the luff measure the distance between the tubes. This distance should be just enough to allow the main to bulge out from the centre line to form a chord of 1:8 or 1:10, whichever you have chosen. Now measure the distance between the tubes at the piece of wood. This will be the width of the boom crossbar. The other battens will reduce in width towards the mast head because of the taper formed by the lazy jacks and are found by measurement, drawing the end view of the mast with the boom then the triangle formed by the lazy jack. On Miranda the mast head has a cross tube welded into place. It has eyelets spread 350mm apart that the lazyjacks attach to. This means my upper battens are wide enough to keep a reasonable sail chord.
At the fronts of the boom and other battens will be a shorter crossbar than the main crossbar. This keeps the batten sides under tension. Check the battens sit on top of each other and do not drop through. Increase the width of the front crossbar if necessary.
Finally, keeping all the battens, apart from the yard, the same length behind the mast makes it easier to drop the sail without tangles in the sheet. On the upper battens the main leech might need a second crossbar further away from the sheetlet attachment.
Halyard
For smaller sails, say up to 30m2, a three-part halyard is usually sufficient. There is a double block at the masthead and a single block on the yard or top batten. The hoist runs to the masthead, down to the yard then up to the second half of the block, finishing at the rear of the (horizontal) yard or about half way along an angled yard at an angle of 30/45 degrees. Use bearing blocks to reduce friction. Modern synthetic rope is very strong but I use 12 or 13mm diameter rope for the halyard as it is easier to handle than thin strong cord.
Sheeting
Traditional junk rig sheeting uses multi-part sheets from the rear of the cockpit with sheetlets between pairs of battens so when reefed, tension on the sheetlets pull the batten ends together. This can also apply to the AeroJunk and would be my number 1 choice for an offshore boat. However yards of rope sweep across the cockpit on each change of tack so some form of hoop over the cockpit is desirable.
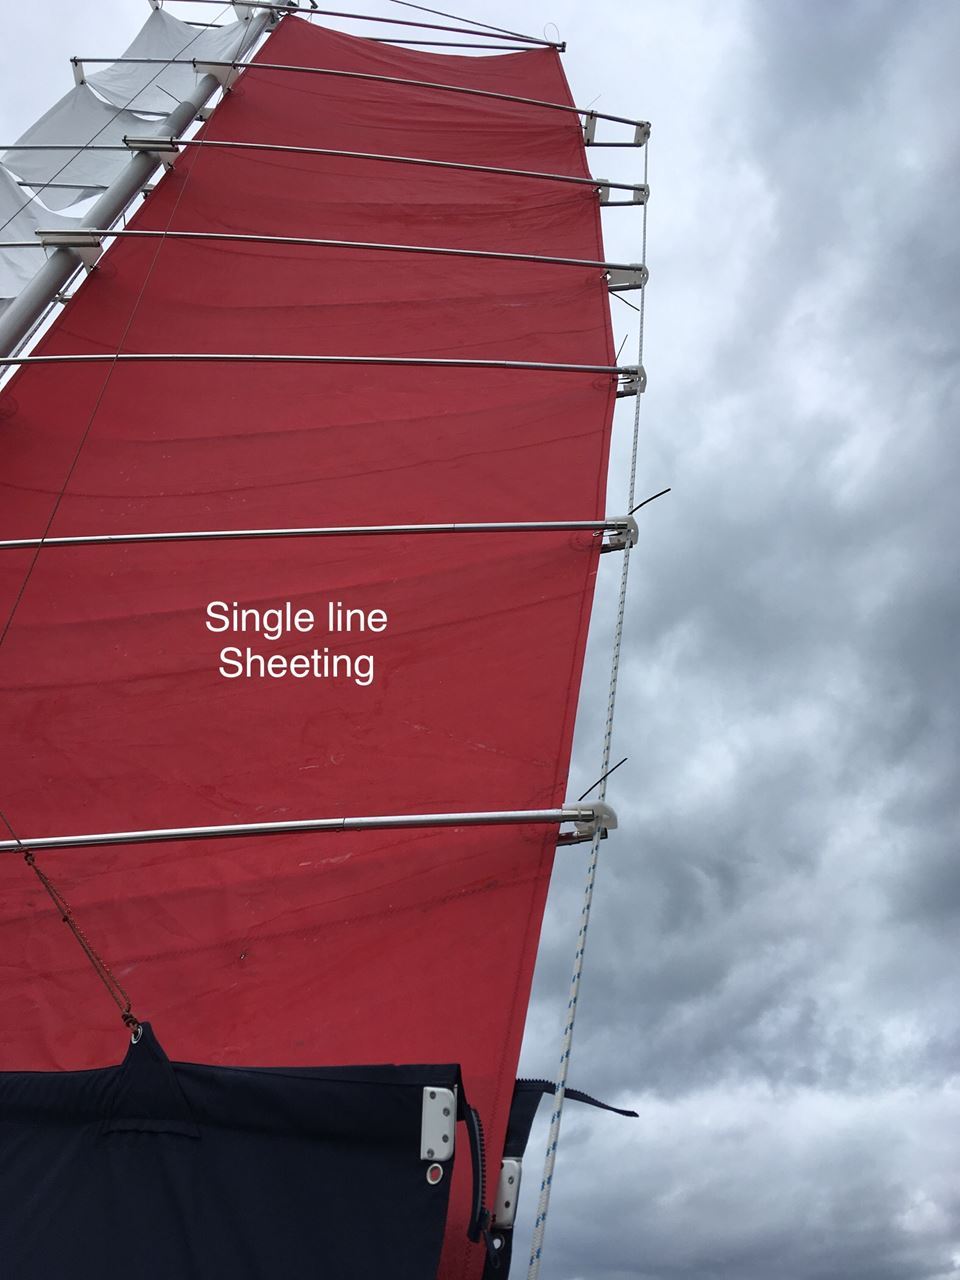
For inshore boats a single sheet system can be preferable. This can run from the original cockpit track rather than the stern so keeps the sheet clear of the helmsman on changes of tack. Because of the balanced nature of the AJ a 3 part sheet is sufficient, running from hand to the cross track, up to a block under the boom, down to the cross track then up through eyelets or blocks at the ends of each batten, finally attaching to the tail of the halyard near the rear of the top batten. When reefing or dousing the sheet slides easily down through the eyelets on the batten ends. Tension on the sheet is resisted by the halyard so presses the battens in towards the mast reducing twist in the mainsail.
Reefing
As Miranda is used as an inshore day boat I generally need only two reefs in normal sailing, although like any Junk I can drop the sail down to a couple of panels if necessary. So
I have two downhauls on the mainsail luff fixed to battens 1 and 2. I also have combination downhauls fastened from the jib luff via the foot of the mast to the cockpit. These are fixed to eyelets at the front crossbars of boom, batten 1 and batten 2. These also hold the battens down when reefed. There is a fixed line between the boom crossbar and the foot of the mast. The sail is raised until this line is taut then the jib downhauls are lightly tensioned.
If your boat has a tendency for the boom to lift when going downwind then a second fixed line can be fitted between the base of the mast and and a bridle halfway along the boom.
Fitting the battens
Detach the front of the boom then fit the open end round the mast. Use a loop of rope or something like an adjustable luggage strap to compress the front ends of the wishbone then re-attach the front bar. Fit the lazy jacks starting at the rear then the front and adjust until the boom is level and at the correct height. (The helmsman should be able to see under the boom when sitting down.) The remaining battens are now fitted in order round the mast and inside the lazy jacks, all sitting on top of the boom.
Fitting the sails
Choose a day with light winds and start with the mainsail. I find it easier to place the folded sail on top of the cabin under the boom. Pull the sail up through the battens then using pieces of cord, cable ties or shackles fix the head of the sail to the ends of the yard or top-most batten. The halyard is also fitted to the luff and leech eyelets at the head of the sail. Hoist the sail until the next eyelets are adjacent to the next batten and fix. Continue until the whole sail is fastened. Lower the sail then repeat adding the jib. The luff of the jib is fixed to the centre of each front crossbar. The slide line is detached from one side, fed through the leech eyelet then re-attached. The jib should be nearly taut when it touches either side batten. This slide line or the front cross bar can be moved forwards or back after a trial sail.
(The job of the slide line is to prevent the jib lifting and blowing out beyond the batten sides, especially when reefed.)
Adjusting the sails
Mainsail
As the mainsail is made flat, pulling each leech tight will result in no camber so the luff to leech distance at each batten will be ‘x’ feet or metres. I have found if you reduce the ‘x’ measurement by 2% this will produce a camber of 1:8. (A camber of 1:10 will be slightly less than 2%) Because of the batten curvature the position of this camber will be between 30/35% chord. (Nearer 40% for 1:10 camber)
If you are using telescopic tubing then the final position can be fixed by reducing the batten length. Otherwise fit a figure of eight support line round the batten sides and through the leech eyelet then slacken the outhaul line. Alternatively, stretch a short horizontal line through the eyelet across the batten sides and fix in place with S/S hose clips.
Jib
Again, as the sail is made flat, the stretched distance between any luff eyelet and its leech eyelet AT EITHER BATTEN SIDE (not in the centre of the batten) produces no camber. Move the slide line forward at each side by 2% to produce the 1:8 camber. (Or move its front crossbar back.) Note the jib becomes slack when in the centre of the batten between tacks.
Sail Downhaul
Because my upper wishbone battens are quite light in weight I find it useful to have a sail downhaul line running from below the halyard on the top batten, down to a block at the foot of the mast then back to the cockpit. This helps to stow the sails before returning to port. The top batten tends to come down at an angle but pulling on the single sheet helps to straighten that too.
Batten Slap
During normal sailing the sails hang to leeward with the windward batten sides pressed against the mast. However with little or no wind and a heavy swell the battens will swing from one side to the other ‘slapping’ against the mast each time. To prevent this either drop the sails or rig two lines from the uppermost lazyjack attachment points, bring them down along each side of the mast inside the battens and attach to turning blocks on the deck in line with the base of the mast and back to the cockpit. Space each block out from the mast at least half boom width. Tensioning these lines during a swell will keep the battens from hitting the mast. These lines will be kept slack during normal sailing.
Boat Balance
When the boat was designed, the designer went to great lengths to ensure that the boat balanced on the waterline with the usual crew in the cockpit.
When converted to Junk Rig the mast is usually placed further forward. As a mast can weigh 50 or more kilos it can affect the balance of the boat on the water by pushing the bow down. This can often be corrected by moving permanent heavy items aft, such as the main boat battery and anchor chain, to a stern locker. The increase in lever will now balance the new mast position.
Sail Covers
Moored boats need a sail cover to protect the sailcloth from sunlight. As the wishbone battens give the sail a bulky shape when doused making a conventional cover could be a headache.
The simplest way to cover the sail is as follows -
Measure the length of the wishbone sides at the boom from just ahead of the mainsail luff to just behind the mainsail leech. Do the same for the jib.
Measure from the wishbone boom side up to the top of the sail and wishbone bundle, both at the mainsail luff and leech. This is the height that lugs will be sewn on to carry the lazyjacks. Repeat with the jib. The lugs would be spaced fore and aft to match the present lazyjack points.
Measure from the lazyjacks lines to just past the centre of the bundle, again at the luff and leech. Repeat with the jib. This is where a heavy duty zipper will be sewn on.
When made up you will have two long and two shorter tapered panels of heavy canvass. The sides opposite the zipper will have 4 or 6 eyelets near the edge of the cloth. Each of the longer and shorter pieces of canvass will have half a zipper sewn along the other edge.
Fit one half of the longer pieces with cable ties through the eyelets to one side of the boom then it’s opposite to the other side. Transfer each lazyjack line to the corresponding lug. Repeat with the jib cover.

(I split my lazyjacks so that I have 4 lines for the mainsail and 4 lines for the jib)
I keep the open end of the zippers at the front of the jib and the back of the main so when zipped up the closed ends lie at the mast. The actual zips are about 6” or 150 mm longer than the covers so that 3” or 75mm sticks out at each end. This is to facilitate zipping up.
Finally close off the underside of the boom wishbone with a honeycomb of light line or fishing net by looping diagonally across between the cover eyelets.
Although the covers are open at each end and underneath the sail stays ventilated and out of sunlight.
When sailing, the cover hangs loosely along the bottom of the sails.
Coda
The AeroJunk, based on the AeroRig is an attempt to use the best features of fore and aft rigs such as the bermudan and combine it with the safety and easy reefing of the Junk Rig. Just like the Junk Rig, it can be let out to 90 degrees for downwind sailing.
Paul McKay 2019